Build a Pro-Level Electronics Repair Kit: 10 Must-Have Tools Every Hobbyist Needs
Table of Contents
TL;DR
- Pro-level vacuum desoldering: The PROS Kit SS-331 gives 140 W and 160-480 °C, perfect for tricky surface-mount work.
- Hands-on hot tweezers: SEQURE HT140 heats to 500 °C and is a quick-fix tool for small SMD parts.
- Reliable low-current measurement: The UNI-T UT211B clamp meter reads 0.1 mA AC and 1 mA DC, so you can spot parasitic drains.
- Powerful EPROM programming: TL866CS and RT809H cover 24/25 EEPROMs, 1.8 V EPROMs, and more.
- Solid cleaning & protection: 99.9 % IPA, ARCTIC MX-4 paste, Chemtronics 8045 braid, heat-shrink, gaffer tape, and Loctite sealants keep boards clean and parts secure.
Why This Matters
I remember the first time I tried to fix a broken laptop charger. The connector was glued in place, and I had no idea how to pull the solder without melting the board. That night, I scoured forums, bought a vacuum desoldering gun, and still ended up scorching a copper pad. It was a learning curve that could have been avoided with the right tools.
For hobbyists and professionals alike, the same pain points show up:
- Desoldering through-hole components without warping the board.
- Cleaning the tiny holes after removing parts.
- Safely discharging high-capacitance components before touching a circuit.
- Reading tiny currents that could be the difference between a working or dead board.
- Programming legacy EPROMs that are no longer on the market.
Having a curated set of tools that address these tasks turns frustration into a systematic workflow.
Core Concepts
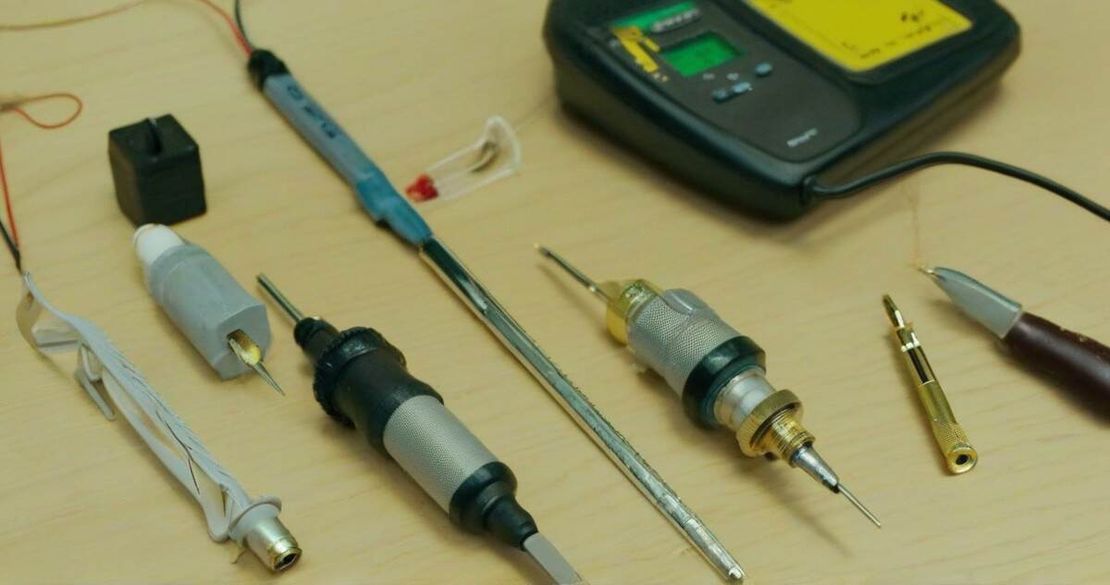
- Vacuum Desoldering Guns – The PROS Kit SS-331 and Yihua 948 are the two most popular stations. They combine a 140 W heater with a vacuum pump that pulls molten solder away in a fraction of a second. The SS-331’s 160-480 °C range and 140 W power make it suitable for both through-hole and BGA work, while the Yihua 948’s 75 W unit is lighter and still handles 380-480 °C for fine SMDs.
- Hot Tweezers – SEQURE HT140’s 140 W head and 50-500 °C range allow you to solder or desolder tiny components without a separate iron.
- Component Analyzer & Curve Tracer – These tools let you test diodes, transistors, MOSFETs, and compare PCB traces.
- High-Voltage Tester – The TIETZSCH HS 5MA can generate up to 4 kV and set currents as low as 5 mA, perfect for checking insulation on power supplies.
- Clamp Meter – The UNI-T UT211B measures AC down to 0.1 mA and DC to 1 mA, catching phantom loads.
- Power Supply & USB Analyzer – A 12-V regulated supply and USB analyzer give you clean power and real-time bus data.
- EPROM Programmers – TL866CS (1.8 V EPROMs) and RT809H (24/25 EEPROMs) let you write or read old chips.
- Solder Braid & Heat Sink – Chemtronics 8045 braid cleans solder flux and fits BGA rework; ARCTIC MX-4 paste keeps CPUs cool.
- Cleaning & Protection – 99.9 % isopropyl alcohol removes flux, heat-shrink tubing seals connections, gaffer tape holds parts in place, and Loctite seals delicate mounts.
How to Apply It
- Start with a Vacuum Desoldering Gun – Choose SS-331 for a versatile, high-power station or Yihua 948 for a lightweight, lower-power option. Set the temperature just above the melting point of the solder (typically 350 °C for lead-free). Then press the trigger; the vacuum pulls the molten solder into a collection tube.
- Use Hot Tweezers for SMDs – Heat the HT140 to the recommended temperature for the component, place it in the tweezers, and slide it into place. The tweezers stay hot for seconds, so you can finish the joint quickly.
- Check Components with an Analyzer – Load a MOSFET into the analyzer; it will display the breakdown voltage, on-resistance, and gate threshold.
- Verify Traces with a Curve Tracer – Connect two points on a PCB and observe the voltage difference. A perfect match means the board is intact.
- Test Insulation with a 4 kV Tester – Set the tester to 4 kV and 5 mA. Place the probe on the component’s pad; a reading above the expected leakage indicates a bad connection.
- Measure Currents with a Clamp Meter – Wrap the UT211B around a conductor. The meter will show AC and DC values with 0.1 mA and 1 mA resolution, letting you spot hidden drains.
- Program or Read EPROMs – Insert the chip into a TL866CS or RT809H adapter. Use the software to read or write data. For 1.8 V EPROMs, the TL866CS is the only affordable choice.
- Clean and Protect – After removing a component, wipe the pad with 99.9 % IPA and a lint-free wipe. Apply Chemtronics 8045 braid over the cleaned area; it dries in minutes and makes rework easier. Coat the CPU or sensor with MX-4 paste to manage heat. Cover the soldered joint with heat-shrink tubing, then secure with a strip of gaffer tape. Finally, use Loctite to lock mounting screws or wire harnesses.
Metrics & Numbers
| Tool | Key Specs | Typical Use |
|---|---|---|
| PROS Kit SS-331 | 140 W, 160-480 °C, 0.05 MPa vacuum | Through-hole, BGA |
| Yihua 948 | 75 W, 380-480 °C | Fine SMD |
| SEQURE HT140 | 140 W, 50-500 °C | SMD soldering |
| UT211B | 0.1 mA AC, 1 mA DC | Low-current detection |
| TIETZSCH HS 5MA | 4 kV, 5 mA | Insulation testing |
| TL866CS | 1.8 V EPROM | Legacy firmware |
| RT809H | 24/25 EEPROM | Bulk memory |
| Chemtronics 8045 | 80-4-5 | BGA rework |
| MX-4 | 4 g, 125 °C | CPU heat sink |
| 99.9 % IPA | 99.9 % purity | Flux cleanup |
Pitfalls & Edge Cases
- Paper-resin boards: Excessive heat can warp or delaminate. Use a temperature-controlled gun and keep the probe on the pad for 1-2 s.
- High-capacitance discharge: Always disconnect the supply and use a resistor across the capacitor (10 kΩ) before touching it.
- Solder braid size: The 80-4-5 braid is 2.8 mm wide; use a thinner braid for small pads.
- Heat-sink compatibility: MX-4 paste is non-conductive; it must be used on metal pads only.
- Clamp-meter zeroing: If the UT211B shows a reading on an isolated conductor, switch to the “Zero” mode and recalibrate.
- EPROM voltage levels: TL866CS only supports 1.8 V EPROMs; for 5 V EPROMs, you’ll need a different programmer.
Quick FAQ
| Question | Answer |
|---|---|
| How do the performance differences between the PROS Kit SS-331 and the Yihua 948 compare in real repairs? | The SS-331’s higher power and larger vacuum pump make it faster for heavy solder joints, while the Yihua 948’s lower heat and lighter weight are ideal for portable, fine-SMD work. |
| What criteria should be used to select a component analyzer for specific repair tasks? | Look for voltage range (up to 100 V), current measurement (≤100 A), and built-in diode/LED tests. A curve tracer is preferable if you need to compare PCB traces. |
| When is it preferable to use a high-voltage tester versus a curve tracer for MOSFET diagnostics? | Use a high-voltage tester to check insulation and leakage; use a curve tracer to see the exact voltage swing across the MOSFET’s drain-source path. |
| What are the best practices for safely discharging high-capacitance components? | Use a 10 kΩ resistor across the capacitor, let it discharge for a few minutes, and double-check with a meter before touching. |
| How can a technician effectively organize and label spare components for quick access? | Store parts in labeled drawer units or clear bins with color-coded tabs; keep a small inventory list on a tablet for instant lookup. |
Conclusion
With the right mix of vacuum desoldering guns, hot tweezers, clamp meters, EPROM programmers, and cleaning supplies, you can transform a daunting repair job into a structured, efficient process. Start by choosing the SS-331 or Yihua 948 for desoldering, then add the UT211B clamp meter and TIETZSCH HS 5MA tester for diagnostics. Keep a tidy supply of IPA, MX-4 paste, Chemtronics braid, and heat-shrink, and you’ll be ready for any PCB repair challenge. The tools are an investment, but the confidence they bring is priceless.