Discover how to draw a Yantra step-by-step, with symmetry hacks, petal construction, and framing tips for artists and geometry hobbyists.
How I Mastered the Yantra: Step-by-Step Drawing Guide for Artists & Geometry Hobbyists
Published by Brav
Table of Contents
TL;DR
- I’ll walk you through a 32-part Yantra, showing how to keep symmetry, line thickness, and petal count on track.
- You’ll learn how to divide circles with a compass, construct triangles from intersection points, and frame the design with squares.
- I’ll share practical hacks for large-scale drawings and common pitfalls that trip up even seasoned hobbyists.
Why this matters
I’ve spent years sketching circles and triangles with a ruler and a pencil, and every time I tried to draw a Yantra I found myself chasing symmetry. A misplaced line meant the whole diagram collapsed into a visual mess. For artists and geometry lovers, the pain points are real: ensuring symmetry, maintaining consistent line thickness, keeping track of multiple steps, and dividing circles into equal parts. This guide cuts through the chaos, giving you a mental model that keeps each part of the Yantra in perfect balance.
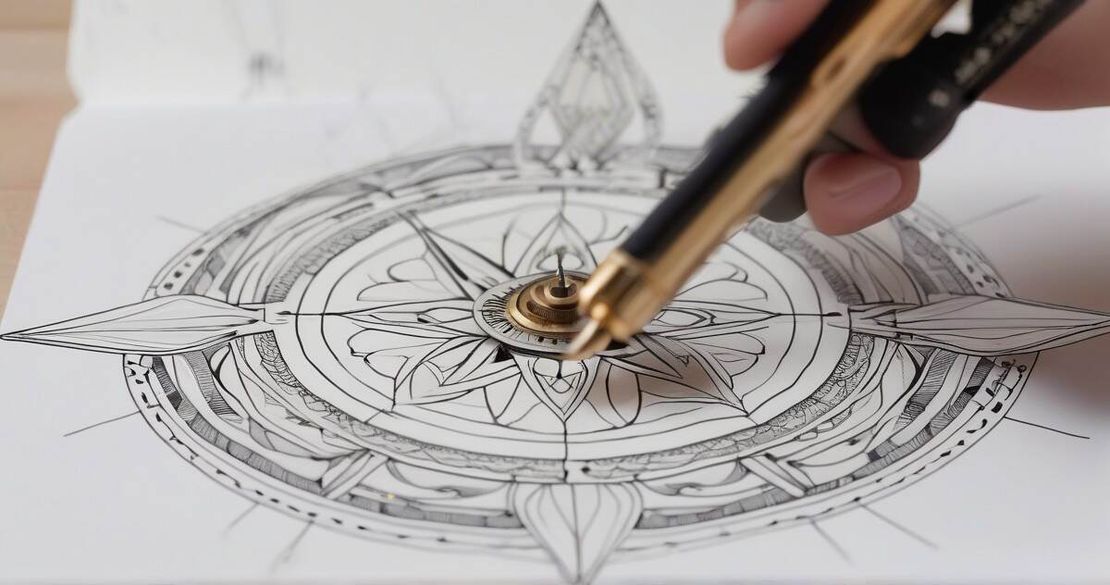
My first Yantra attempt
When I first tackled a Yantra on a 30 cm × 30 cm sheet, I was confident in my compass skills. I drew the outer circle, then the vertical diameter, and proceeded to the chords as described in the online tutorial. After sketching the first ring of petals, I noticed a slight skew: one petal tip was off by a centimeter. The bindu, meant to sit in the exact center, was shifted to the left. The entire diagram looked lopsided, like a ship with one mast out of place. That day I stopped, washed my hand, and realized the root of the problem was a simple but stubborn habit: I was drawing the frame by eye without a reference line, and I had been marking circles with different compass settings. The lesson was simple—draw every component from a single reference point, and mark frame lines in pencil first.
Core concepts
A Yantra is a sacred geometry diagram used in Tantric Hinduism and Vajrayana, composed of interlocking triangles, circles, and squares that symbolize cosmic energy. The design I’ll cover is divided into 32 equal parts, featuring three concentric petals: eight in the first ring, sixteen in the second, and a central bindu at the heart of the diagram [Yantra — Wikipedia (2023)]. The outer frame is formed by three concentric squares; the gates appear where the squares intersect the circles, forming T-shaped openings that channel energy toward the bindu [Yantra — Britannica (2023)]. The octagonal division of the circle into 32 parts, along with the triangular pattern of the petals, creates a perfect balance between the dynamic upward and downward triangles, a hallmark of the Sri Yantra [Smphillips — The Sri Yantra Part 3 (2023)].
Step 1: Draw the base circles
- Sketch a circle that is half the size of the final Yantra. If your final size is 30 cm, the base circle should be 15 cm in diameter.
- From the center of this circle, draw a vertical diameter line.
- Mark 48 equal segments along the diameter using a ruler; these will serve as the foundation for your chords.
- Keep a clean pencil line—this diameter will be your reference for all subsequent steps [Smphillips — The Sri Yantra Part 3 (2023)].
Step 2: Construct chords and triangles
- At the 6th, 12th, 17th, 20th, 23rd, 27th, 30th, 36th, and 42nd marks, draw chords perpendicular to the diameter.
- Label the chords 1–9.
- Shorten each chord as described: chord 1 reduced to 1/16th, chord 2 to 5/48ths, etc.
- Use the shortened chords as bases for eight triangles; the apexes come from the midpoints of other chords.
- This step creates the triangular skeleton that will hold the petals and bindu in place.
- All measurements come directly from the chord-construction steps in the tutorial page [Smphillips — The Sri Yantra Part 3 (2023)].
Step 3: Locate the bindu
- The bindu is the single dot at the intersection of the central triangle’s apex and the vertical diameter.
- Ensure it sits precisely at the center of the circle; even a 0.5 cm shift will unbalance the whole diagram.
- The bindu is the heart of the Yantra, the point where all energy converges [Yantra — Wikipedia (2023)].
Step 4: Build the first petal ring
- Mark 16 equidistant points on the outer circumference, starting from the top of the diameter.
- Use a compass with a radius equal to the distance between adjacent points; draw arcs connecting each pair of points.
- The arcs will form eight petals that radiate outward like a lotus.
- These petals sit inside the first ring and are the foundation for the second, larger ring.
- This method of petal construction is described in the tutorial, ensuring symmetry and consistency [Smphillips — The Sri Yantra Part 3 (2023)].
Step 5: Expand to the second petal ring
- Circumscribe a new circle that just touches the outer edge of the first ring’s petals.
- Divide this circle’s circumference into 32 equal divisions; each division will be the center of a petal tip.
- Draw sixteen petals symmetrically around the circle, each formed by connecting two adjacent divisions with arcs.
- The result is a second, larger ring of petals that doubles the count from the first ring.
- The 32-division rule aligns with the symbolic structure of the Yantra [Smphillips — The Sri Yantra Part 3 (2023)].
Step 6: Frame the Yantra with squares
- Draw three concentric squares around the outer circle; keep the spacing uniform between each square.
- The innermost square should not touch the outer circle, the middle square should create four gates (openings) on its sides, and the outermost square completes the frame.
- The gates act as T-shaped openings that channel energy toward the bindu; they are formed where the square edges intersect the circle.
- Mark the square lines in pencil first; once you’re satisfied, trace them with a fine-point pen to avoid mistakes. The frame is often drawn “by eye” because the Yantra is large enough that minor deviations are imperceptible, but pencil marking keeps errors in check [Smphillips — The Sri Yantra Part 3 (2023)].
Step 7: Final touches
- Inspect the diagram from a distance; symmetry should be immediately apparent.
- If any petal tips or triangle vertices appear skewed, adjust the compass or chord length slightly—precision here is key.
- Lightly shade the bindu to emphasize its centrality.
- Once satisfied, go over all lines with a dark pen to solidify the design [Smphillips — The Sri Yantra Part 3 (2023)].
Method comparison
| Method | Parameter | Use Case | Limitation |
|---|---|---|---|
| Compass Arc Method | Precision of arc radius | Ideal for petal construction and circle division | Requires a steady hand and a calibrated compass |
| Protractor & Ruler Method | Angle measurement | Quick way to divide a circle into equal parts | Less accurate for fine divisions; prone to cumulative error |
| Digital Software Method | Digital scaling | Useful for large-scale or printed versions | Needs a computer and may lose the tactile feel of hand drawing |
Pitfalls & edge cases
- Uneven petals: inconsistent compass radius will produce petals of varying lengths. Fix: set the compass once, keep the pencil firmly on the tip, and take breaks if fatigue sets in.
- Off-center bindu: a small shift in the vertical diameter can push the bindu off center. Fix: double-check the diameter with a second line perpendicular to it.
- Misaligned gates: if the squares are drawn too close or too far from the circle, the gates will be uneven. Fix: use a ruler to set a fixed distance between the circle and each square.
- Large-scale distortion: paper warps when drawing big Yantras, especially on a 40 cm canvas. Fix: lay the paper on a flat, rigid board or use a drafting table.
- Line thickness mismatch: switching pens mid-draw can create visual clutter. Fix: choose a single pen type for all lines, then use a darker pen for the final outline.
Quick FAQ
Q1. What is the symbolic meaning of the 32 divisions? A1. The 32 divisions correspond to the 32 energy channels (nadis) that converge at the bindu, creating a microcosm of the universe. They’re also linked to the 32 steps in various Tantric sadhanas [Smphillips — The Sri Yantra Part 3 (2023)].
Q2. How precise must my compass arcs be? A2. Accuracy within 0.05 mm is sufficient for most paper drawings; the key is consistency across all petals.
Q3. What materials should I use? A3. A good quality sketch paper (200–300 gsm) and a mechanical pencil (HB or 2B) for fine lines, plus a fine-point ballpoint or technical pen for final outlines.
Q4. Why are three squares used in the frame? A4. The squares represent the earthly, astral, and spiritual realms; their intersections form the gates that channel energy into the central bindu [Yantra — Britannica (2023)].
Q5. How does the bindu function within the geometry? A5. The bindu is the point of convergence; it’s where all lines meet and where the cosmic energy is focused, making the Yantra a tool for meditation.
Q6. Can I change the number of petals? A6. Yes, but altering the petal count will change the symbolic structure; traditional designs keep eight and sixteen petals for balance.
Q7. How do I scale the drawing up or down? A7. Maintain the ratio of all dimensions; use a ruler or a digital scaling tool to keep proportions constant.
Conclusion
By treating each step as a puzzle piece, you can master the Yantra’s complex geometry without feeling overwhelmed. Start small—draw a simple circle and a vertical line—then build layers patiently. Keep a mental checklist, use pencil for the frame, and double-check your compass settings. When the final design looks symmetrical from a distance, you’ll know the Yantra is ready. Try experimenting with different square spacings or petal shapes; each variation offers a new perspective on sacred geometry. If you’re curious about the deeper philosophical meanings, look into Tantric geometry texts that explore the bindu and the 32-fold symmetry. Happy drawing!